How to Design Your Own Wedding Invitation Suite

Hey there, welcome to my blog! In this post, I’m excited to share with you how to design your own wedding invitation suite with Zazzle.


It was an incredible opportunity as Zazzle reached out to me to create a video for their YouTube channel, where I could showcase the process of creating my own wedding invitations that beautifully represent my wedding theme.

Join me as I walk you through the steps, tools, and inspiration behind this creative journey in the video below.

How to Design your own Wedding Invitation Suite

To get started, I made a list of all the items I needed to assemble my wedding invitation suite.

From the main invitation and RSVP cards to belly bands, custom envelopes, stickers, and more, Zazzle had everything I needed to bring my vision to life.

For design inspiration, I turned to my curated wedding Pinterest board, where I have been gathering ideas and inspiration for the overall theme and style I want for my wedding.

Items needed for the invitation suite:

All of the items I used for my invitation suite are linked below, with the exception of the return address labels which I creating using the “Design Transfer” option. This is demonstrated in the video above.

Using Zazzle’s Design Tool, I was able to customize every aspect of my invitations including the colors, fonts, and layouts to achieve the exact look I envisioned. Plus, I could select different paper types and sizes to ensure my invitations looked exactly how I wanted.

how to design your own wedding invitation suite on zazzle

Digital Download or Physical Products

When it came to acquiring my customized invitations, I opted for the printed version. However, it’s worth mentioning that Zazzle’s digital download option is a great cost-saving alternative, and offers flexibility if you prefer to send your invitations electronically via text or email. It’s a modern, eco-friendly approach that still ensures your invitations look stunning while accommodating different preferences and budgets.

Putting the Invitation Suite Together

Once all of the different pieces arrived, it was time to put it all together. You can watch the process of putting together the invitation suites in the video above.

I started with the main invitation and then put the RSVP card on top. Attaching the belly band neatly held the components together, creating a cohesive suite. Adding custom stickers and return address labels to the envelopes added that extra touch of personalization. Lastly, I used an embosser to add a custom touch to the envelopes.

how to design your own wedding invitation suite with Zazzle

The Finished Product

I’m very happy with the finished result. Each invitation showcases our unique style and attention to detail. The suite truly sets the tone for our special day and leaves no doubt that our wedding will be an unforgettable event.

My friends and family loved these wedding invitations and said they would keep them as cherished mementos for years to come!

Conclusion

Designing your own wedding invitations with Zazzle was a fun and rewarding experience. It allowed me to bring my vision to life and create invitations that were exactly how I wanted.

Zazzle’s affordability, convenience, and customization options made it the perfect choice for this creative endeavor. If you’re seeking personalized wedding stationery that stands out from the crowd, I encourage you to explore the possibilities on Zazzle’s website.

I hope this post has inspired you to design your very own wedding invitation suite.

If you want to learn more about selling your own designs through Zazzle, check out this post: Sell your Art on Zazzle: A Step by Step Guide to Setting up Your Zazzle Store.

Thanks for joining me, and feel free to leave any comments or questions below. Happy designing!

Cheers,

julie signing off

Easy DIY Deer Halloween Costume

easy diy deer fawn halloween costume

Hey guys! With Halloween coming up soon I thought I would share another costume idea:
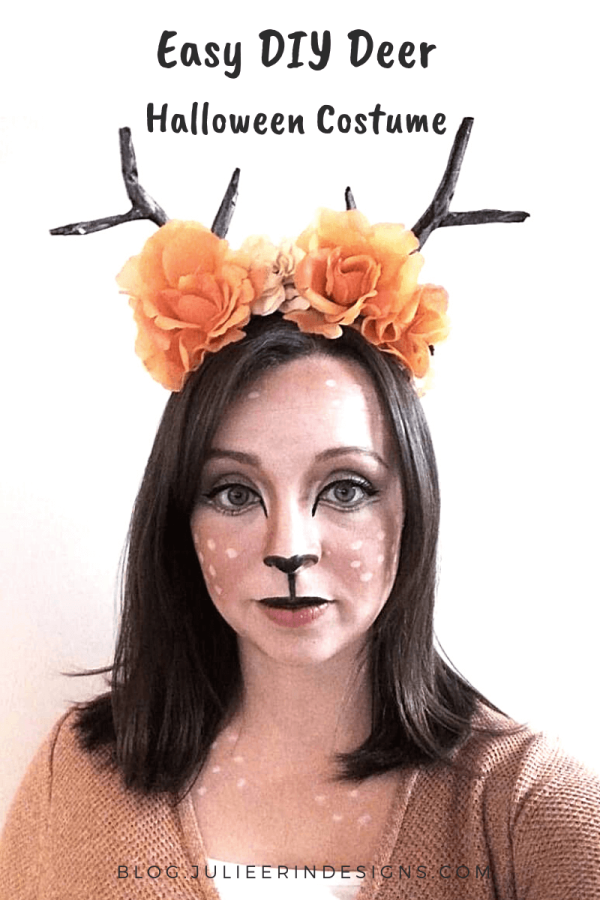
Easy DIY Deer Halloween Costume

This is a fairly simple costume, and the finished result is adorable and totally work appropriate.

Materials used for the deer makeup:

  • bronzer
  • black liquid eyeliner
  • white eyeliner
  • brown eyeshadow

For the makeup look I searched for deer makeup ideas on Pinterest, and then combined a few different looks, keeping it simple. You’re welcome to copy my makeup.

Materials for the antlers

I followed Lauren Conrad’s tutorial to create the antlers. However, I used standard paper maché instead of Modge Podge.

Recently I’ve seen some pre-made headbands like this at Michaels and other places, so if you can find one of those it might be easier than making it yourself unless you enjoy that sort of thing, like I do!

The floral headband was re-purposed from my Day of the Dead costume. But you could glue the flowers to the antlers once they’re dry, or glue them to a second headband and wear the two together.

  • headband(s)
  • fake flowers from the dollar store
  • glue gun
  • newspaper strips and paper maché
  • brown and silver acrylic paint
  • pipe cleaners

Deer costume outfit

I wore a tan coloured sweater over a white tank top, but you could wear something else you have on hand, or create an outfit to go with it.

  • tan coloured sweater
  • white tank top
  • black leggings
  • black boots

I hope you like this simple DIY deer Halloween costume! Let me know what you’re dressing up as this year in the comments below.

Check out more of my DIY Halloween costumes here:

Cheers,

julie signing off

How to Clean up Line Art using Photoshop and Illustrator

clean up line art photoshop
cleaning up line art in photoshop illustrator

Hello friends! Today I would like to share with you how to clean up line art drawings using Photoshop and Illustrator.

Smoothing out your line art is especially important if you are selling artwork printed on shirts and other products through Print on Demand stores like Redbubble, Zazzle, Society6, etc.

This is just one of many ways I create designs, and a technique you can use to turn black and white drawings into digital line art — which you can then use any way you choose.

How to Clean up Line Art using Photoshop and Illustrator

 Start out with some ideas in your sketchbook, and make a short list of designs to try drawing.  I often look online for inspiration and have a few things in mind before I get started.

sketchbook

  • Once you have a design you like, re-draw it lightly on a clean page in pencil.
  • Go over the pencil drawing with a black Sharpie or another fine black ink pen, to get something like this:
sketches black and white

  • Make sure you erase all pencil lines.
  • Scan each design separately into Photoshop.
line drawing in photoshop

  • Clean up the image as much as possible using tools such as desaturate, Brightness/Contrast, Curves, and erase to clean up any little black dots or dust bits that are showing.  
  • You can also use the colour selection tool to select the black line only, then create a new layer and fill it in with black. Once I am finished with this step, I save the file as a .PSD.
  • Next open the .PSD file in Illustrator, and use the Live Trace or Image Trace tool to turn your design into a nice smooth vector image. This is a great tutorial on using Live Trace in Illustrator that I often follow.
live trace in illustrator

  • The result of this process is that you get much smoother lines. This is important if you are having the designs printed, especially in large sizes.
  • Save the image as a .AI file.
  • Open up the file in Photoshop and set the pixel size to something large, like 10,000 x 10,000 pixels.
  • Fill or colour your line drawing however you like.  I like to use layers, fill with gradients and use layer settings (ex. Screen) or just paint on another layer using a drawing tablet.  There is basically an endless variety of ways you can use your line art.
  • Save your finished design as the correct file type and size(s) for the POD site you are creating for.  I always save a .PSD file as well (with all my layers in tact) so I can open it again later and use the same design multiple times.

Here are some examples of work that I have used this technique for:

tangled black and white yin yang mandala live trace illustrator
pot head teapot live trace illustrator tutorial

And there you have it!  Hopefully you now have a little bit of insight into how I create my designs for sale, and maybe even learned a new technique to try out for yourself.

Feel free to leave any questions or comments about this process in the comments section below.

Have a great week everyone!

Cheers,

julie signing off

Ojo De Dios (aka God’s Eye) DIY Yarn Mandala Craft

ojo de dios gods eye diy yarn mandalas

I got a little bit crafty this weekend and made these super fun and pretty Ojos De Dio (aka God’s Eye) ornaments, which are basically 3D yarn mandala weavings!

They are really easy, making them a great DIY project which can even involve your kids! Making them can be a nice relaxing activity to do while watching TV, sitting on your patio, enjoying a hot cup of tea, etc.  You get the picture.

Supplies needed:

  • 2 – 4 Sticks of any length (I used kabob skewers from the dollar store, and cut off the pointy ends)
  • Ruler
  • Pen
  • Glue Gun
  • Various colours of yarn (scraps can be used)
  • Scissors

Simply measure your sticks with a ruler and mark them in the centre, then use your glue gun to glue the 2 sticks together in a cross shape.  Let the glue dry completely before starting your weaving.

pink god's eye mandala diamond square shape

Step-by-step tutorial for the diamond style God’s Eye.

The easiest style of God’s Eye is a 4 sided, diamond shape design using only the 2 sticks, like the one above.

Step by step tutorial for an 8 sided God’s Eye yarn mandala.

For a more complicated design, use 2 sets of sticks, creating an octagonal shape. Don’t glue the 2 sets together, as you will attach them together using yarn.


These 8 sided yarn mandalas are still pretty easy to make, and once you get the hang of them you can easily create your own patterns! I love how mine turned out.

yarn mandala diy craft project kids

close up ojo de dios diy yarn mandala craft

These ornaments are really versatile.  You can make them from something as small as toothpicks, or even sticks you find outside and you can make them as big or as small as you want!

You can use them to decorate your walls, give as gifts, use as Christmas tree ornaments and more! Feel free to post other ways you use these in the comments section below!

Make sure you follow my blog for more creative inspiration, and to see more of my art and design projects in the future.

I hope you have a great week.

Cheers,

julie signing off

Free Skull Printable

free sugar skull printable

Hey everyone! Today I would like to share with you guys this free skull printable I drew myself!

Wow I can’t believe it’s October again, I feel like this year has really flown by. I am already getting into a “Halloween mood” and started drawing some Sugar Skulls to celebrate!

Click on the image of the skull below to open it in a new tab and then right click and save the image to your computer. 

It is set up so you can easily print it out and colour it in by hand, or use your computer to paint it using any program of your choice (MS Paint, Photoshop etc.).  If you have any questions or difficulties please let me know.

Please do not claim as your own or use for commercial use.

free blank skull printable

Feel free to colour this skull printable yourself, and give it out to your friends and family members too!

Be as creative as you want with it, it does not have to be a “traditional” sugar skull in any way. Use your imagination! Feel free to post links to your coloured version in the comments section below :)

Ok guys have fun and go nuts!  I hope to see some awesome designs from you all :)

Find more coloring pages and other freebies here!

If you would like to see more of my artwork please visit my website, or follow me on Facebook or Instagram to see my latest work, sales and promotions!

Cheers,

julie signing off

Couples Costume DIY – Fry and Leela

fry and leela couples halloween costume futurama

Yay it’s October!  I love the fall leaves and the crisp air.. and most of all, Halloween! This was my boyfriend and I’s Fry and Leela couples costume.  We wore them to a party and got tons of comments!

If you don’t know Fry and Leela they are characters from the Matt Groening TV show Futurama.  This is a super cute and fun couples costume especially if you are a fan of the show like we are.

You could also wear this as a cute couples cosplay outfit to Comic-con or some other fan event!

fry and leela couples halloween costume futurama

Fry Costume

Fry’s outfit was the easiest, my bf just went out and found a red jacket at a thrift store and used some orange hair colouring spray to do his hair.

Make sure you use that stuff in a well ventilated area and wear old clothes because it will stain!

He paired that with some blue jeans, a white t-shirt and sneakers and was all set.

Leela Costume

This outfit was a bit more complicated due to the whole cyclops thing.

Also, her hair is usually worn in a ponytail but the only purple wig I could find was straight, so I winged it and said I was “party Leela”, when she lets her hair down. I prefer wearing my hair down anyway.

The clothing for the costume is just some black leggings and a plain white tank top paired with black boots.

She also has an arm gadget that you can’t see in the photo because it was on the other arm but I just used cardboard wrapped with duct-tape, then taped on some black paper circles for the “buttons” and whatnot.

A quick Google search for “Leela’s Arm Gadget” will give you an idea of what it looks like.

DIY cyclops eye:

I used some old sunglasses and popped the lenses out.  You could pick up some cheap frames from the Dollar store if you don’t have any laying around.

Then I made an eye shape out of pipe cleaners.

Using a type of fabric called Tulle (found from a craft or fabric store) I cut that into the same eye shape, and then sewed it by hand to the backside of the pipe cleaner circle using white thread. You may be able to use a glue gun instead.

Then using a black self-adhesive felt sheet (which can be found at any craft store like Michaels) I cut out the iris and lashes and stuck them on the fabric.

I tied the whole thing to the sunglasses frames with some string, and it was finished!

Additional Props

Props included a Dollar store water gun for Leela, and we printed off the Planet Express logo (from google) and taped it on all 4 sides of a small box for Fry.

We also made Slurm can beer cozies which were made out of cardboard with the Slurm logo taped on there!

I hope these instructions were easy enough to follow, and inspires someone for their costume this year!

Cheers,

julie signing off